![]() 21.05.2024: Since Ollama can now serve more than one model at the same time, I updated its section. I also simplified Compile Ollama section a bit.
21.05.2024: Since Ollama can now serve more than one model at the same time, I updated its section. I also simplified Compile Ollama section a bit.
It’s hard to say whether Ai will take our jobs or simply become our bosses. However, before this happens, it is worth getting to know it as a tool.
In this tutorial, we will learn how to use models to generate code. We’re going to install llama.cpp and Ollama, serve CodeLlama and Deepseek Coder models, and use them in IDEs (VS Code / VS Codium, IntelliJ) via extensions (Continue, Twinny, Cody Ai and CodeGPT).
Note: I’m using AMD 5600G APU, but most of what you see here also applies to discrete GPUs. Whenever something is APU specific, I will mark it as such. I use containers with ROCm, but Nvidia CUDA users should also find this guide helpful.
Table of Content
- Models for code generation
- Access to services in containers
- llama.cpp
- Ollama
- Compile Ollama (optional, for APU only)
- Ollama models for other uses
- VS Code / VS Codium
- Extensions
- Continue
- Twinny
- Cody Ai
- IntelliJ
- Plugins
- Continue
- CodeGPT
- Cody Ai
Models for code generation
Broadly speaking, when choosing a model, we have to look at its type, size and quantisation:
- instruct type models are designed to answer questions asked in a chat window
- base type models are for automatic code completion, they suggest subsequent lines of code
- model size is the number of parameters in the LLM, e.g. 7 billion, bigger size means more memory is needed and slower the model is
- quantisation is from 2, 3, 4, 5, 6 to 8-bit, bigger bit number means more memory is needed and slower the model is
Code completion models run in the background, so we want them to be very fast. I use small deepseek-coder-1.3b-base-GGUF for this task. Chat models are more on-demand, so they can be as large as your VRAM, e.g. CodeLlama-7B-Instruct-GGUF.
Access to services in containers
By default llama.cpp and Ollama servers listen at localhost IP 127.0.0.1. Since we want to connect to them from the outside, in all examples in this tutorial, we will change that IP to 0.0.0.0. With this setup we have two options to connect to llama.cpp and Ollama servers inside containers.
We can access servers using the IP of their container. This is simple, works for the host and other containers on the same host. We can get the IP of a container with incus list command.
But if we want to expose those servers to other computers on our network, we can use a proxy network device. For each model served, for example one instruct and one base, one proxy devices with a different port is required. The listen address could be an IP of your machine, which you can get using hostname -I | awk '{print $1}' command. Change X.X.X.X accordingly, port depends on whether you are using llama.cpp or Ollama:
incus config device add <container_name> localhost8080 proxy listen=tcp:X.X.X.X:8080 connect=tcp:0.0.0.0:8080
incus config device add <container_name> localhost8081 proxy listen=tcp:X.X.X.X:8081 connect=tcp:0.0.0.0:8081
This option has one drawback. When we disconnect our host machine from the router (unplug the ethernet cable, switch to airplane mode, etc.), containers with proxy devices on that host will not start and will generate an error:
Error: Error occurred when starting proxy device: Error: Failed to listen on 192.168.1.185:8080: listen tcp 192.168.1.185:8080: bind: cannot assign requested address
Try `incus info --show-log test` for more info

$ incus info --show-log test

Name: test
Status: STOPPED
Type: container
Architecture: x86_64
Created: 2024/04/14 18:46 CEST
Last Used: 2024/04/14 18:49 CEST

Log:
lxc test 20240414164901.173 WARN     idmap_utils - ../src/lxc/idmap_utils.c:lxc_map_ids:165 - newuidmap binary is missing
lxc test 20240414164901.173 WARN     idmap_utils - ../src/lxc/idmap_utils.c:lxc_map_ids:171 - newgidmap binary is missing
lxc test 20240414164901.174 WARN     idmap_utils - ../src/lxc/idmap_utils.c:lxc_map_ids:165 - newuidmap binary is missing
lxc test 20240414164901.174 WARN     idmap_utils - ../src/lxc/idmap_utils.c:lxc_map_ids:171 - newgidmap binary is missing
If you only want to use llama.cpp and Ollama on your host, simply access them using the container’s IP address and skip proxy devices.
llama.cpp
For llama.cpp we need a container with ROCm installed (no need for PyTorch). Tutorial for that is here. It’s around 30 GB in size, so don’t be surprised. If you intend to run an IDE in the same container, use a GUI profile when creating it.
Let’s log in to the container using the default ubuntu user:
incus exec <container_name> -- sudo --login --user ubuntu
Getting llama.cpp source code is simple, we can use git clone command with a tag of the latest release:
sudo apt install git ccache make
git clone --depth 1 --branch b3265 https://github.com/ggerganov/llama.cpp
llama.cpp supports UMA, more on that in ROCm tutorial linked before, so I will compile it with necessary flags (build flags depend on your system, so visit the official website for more information). For my AMD 5600G APU I use:
GGML_HIPBLAS=1which provides BLAS acceleration on HIP-supported AMD GPUsLLAMA_HIP_UMA=1which is APU specific, skip it if you have regular GPU or you assigned fixed amount of VRAM to the APU in UEFI/BIOSAMDGPU_TARGETS=gfx900depends on your GPU architecture, more on that in ROCm tutorial linked before
With all that, my compile command looks like this:
cd llama.cpp
make GGML_HIPBLAS=1 LLAMA_HIP_UMA=1 AMDGPU_TARGETS=gfx900
When using llama.cpp, we have to download models manually. The best place to find them is huggingface.co. For example:
- you can search for all GUFF models from TheBloke account https://huggingface.co/TheBloke?search_models=gguf&sort_models=downloads#models
- or all user submitted starcoder2 instruct models https://huggingface.co/models?sort=trending&search=starcoder2+instruct
Let’s download deepseek-coder-1.3b-base-GGUF and CodeLlama-7B-Instruct-GGUF into ~/llama.cpp/models/ folder:
wget https://huggingface.co/TheBloke/deepseek-coder-1.3b-base-GGUF/resolve/main/deepseek-coder-1.3b-base.Q6_K.gguf -P ~/llama.cpp/models/
wget https://huggingface.co/TheBloke/CodeLlama-7B-Instruct-GGUF/resolve/main/codellama-7b-instruct.Q6_K.gguf -P ~/llama.cpp/models/
You can also download models with Ollama and copy them to llama.cpp. See the list at https://ollama.com/library/. We will discuss this option in Ollama section.
Now we can serve those models. I want to serve them both at the same time, so in two separate terminal windows I’m using commands:
~/llama.cpp/./server -c 4096 -ngl 999 --host 0.0.0.0 -m ~/llama.cpp/models/codellama-7b-instruct.Q6_K.gguf
~/llama.cpp/./server -c 4096 -ngl 999 --host 0.0.0.0 --port 8081 -m ~/llama.cpp/models/deepseek-coder-1.3b-base.Q6_K.gguf
Where:
-c Nis the size of the prompt context (default: 512)-ngl Nis the number of layers to store in VRAM (increment until you are using almost all your VRAM, or use value 999 to try to move all layers into memory)--host IPis the IP address to listen (default: 127.0.0.1)--port PORTis the port to listen (default: 8080)-mis the model path- run
~/llama.cpp/./server --helpfor more options
Now the models can be accessed using the container IP address or the IP address of the proxy device if you used one:
http://X.X.X.X:8080
http://X.X.X.X:8081
Ollama
Note: Out of the box Ollama run on APU requires a fixed amount of VRAM assigned to the GPU in UEFI/BIOS (more on that in ROCm tutorial linked before). But we can enable UMA support by compiling it with just two changed lines of code. See the Compile Ollama section below. Users of regular GPUs don’t have to worry about this.
We need a container with ROCm installed (no need for PyTorch), as in the case of llama.cpp. If you intend to run an IDE in the same container, use a GUI profile when creating it.
When installing Ollama, the script will try to download its own version of ROCm, so we have 4 options:
- we already have ROCm 6.0+ inside container, then script will skip this step
- we have ROCm 5.7 inside container, then script will install its own ROCm and this works perfectly fine, Ollama will use version 5.7
- we have a container without a ROCm, then script will install its own ROCm, but this will not work
- don’t use the script and install Ollama manually
For my 5600G APU I use the latest ROCm 6.1.
Let’s log in to the container using the default ubuntu user:
incus exec <container_name> -- sudo --login --user ubuntu
We need to install some required packages before we download and run the install script:
sudo apt install curl nano
curl -fsSL https://ollama.com/install.sh | sh
After script finishes, the default ubuntu user will be added to ollama group and the new ollama service will be started. This service simply runs command ollama serve, but as the user ollama, so we need to set the some environment variables. For my APU I need:
HSA_OVERRIDE_GFX_VERSION=9.0.0andHSA_ENABLE_SDMA=0for ROCm, as explained in the tutorial linked beforeOLLAMA_HOST=0.0.0.0:11434to change IP address Ollama uses to0.0.0.0OLLAMA_MAX_LOADED_MODELS=2to serve two models at the same time, adjust this value as needed
We need to add them to the service using command:
sudo systemctl edit ollama
Add these lines in the blank space:
[Service]
Environment="HSA_OVERRIDE_GFX_VERSION=9.0.0"
Environment="HSA_ENABLE_SDMA=0"
Environment="OLLAMA_HOST=0.0.0.0:11434"
Environment="OLLAMA_MAX_LOADED_MODELS=2"
Full view of service edit
### Editing /etc/systemd/system/ollama.service.d/override.conf
### Anything between here and the comment below will become the new contents of the file

[Service]
Environment="HSA_OVERRIDE_GFX_VERSION=9.0.0"
Environment="HSA_ENABLE_SDMA=0"
Environment="OLLAMA_HOST=0.0.0.0:11434"
Environment="OLLAMA_MAX_LOADED_MODELS=2"

### Lines below this comment will be discarded

### /etc/systemd/system/ollama.service
# [Unit]
# Description=Ollama Service
# After=network-online.target
#
# [Service]
# ExecStart=/usr/local/bin/ollama serve
# User=ollama
# Group=ollama
# Restart=always
# RestartSec=3
# Environment="PATH=/usr/local/sbin:/usr/local/bin:/usr/sbin:/usr/bin:/sbin:/bin:/snap/bin"
#
# [Install]
# WantedBy=default.target
Reload daemon, then restart container and log in again:
sudo systemctl daemon-reload
Now we can access Ollama using commands:
ollama --help
ollama list
Models downloaded using the default ollama service will be stored at /usr/share/ollama/.ollama/models/.
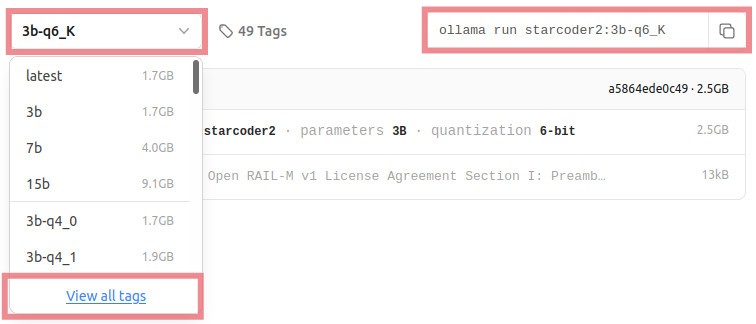
All available models are listed at https://ollama.com/library/. Once you have selected the model you want, click on it, and on its page, from the drop-down menu with label “latest”, select the last option “View all tags” to see all variants. In fact, latest means most popular, so look for models with the same hash to decipher what’s behind it. To the right of the drop-down menu there is a box with the command to run the selected model variant, but we’re not going to use it.
Let’s download the same models as with llama.cpp, but more conveniently:
ollama pull codellama:7b-instruct-q6_K
ollama pull deepseek-coder:1.3b-base-q6_K
Both models can be now accessed using the container IP address or the IP address of the proxy device if you used one:
http://X.X.X.X:11434
Notice that when starting Ollama with command ollama serve, we didn’t specify model name, like we had to do when using llama.cpp. Clients will ask the server for a specific model they need.
Compile Ollama (optional, for APU only)
Compiling Ollama requires newer versions of cmake and go than the ones available in Ubuntu 22.04:
cmakeversion 3.24 or highergoversion 1.22 or highergccversion 11.4.0 or higherlibclblastfor AMD ROCm
Let’s install the latest packages from official sources in our ROCm container:
sudo apt install nano git ccache libclblast-dev make

wget https://go.dev/dl/go1.22.3.linux-amd64.tar.gz
tar -xzf go1.22.3.linux-amd64.tar.gz

wget https://github.com/Kitware/CMake/releases/download/v3.29.3/cmake-3.29.3-linux-x86_64.tar.gz
tar -xzf cmake-3.29.3-linux-x86_64.tar.gz
We need to add extracted directories to the PATH. Open the .profile file with nano .profile and add this line at the end:
export PATH=$PATH:/home/ubuntu/go/bin:/home/ubuntu/cmake-3.29.3-linux-x86_64/bin
Use source ~/.profile command to make sure environment variable is set.
Getting Ollama source code is simple, we can use git clone command with a tag of the latest release:
git clone --depth 1 --branch v0.1.48 https://github.com/ollama/ollama
Ollama uses llama.cpp under the hood, so we need to pass some environment variables with which we want to compile it. There’s an undocumented OLLAMA_CUSTOM_ROCM_DEFS environment variable where we can set CMAKE_DEFS (notice that these parameters are the same ones I used when compiling llama.cpp and may be different in your case, so check the previous llama.cpp section for more information):
echo 'export OLLAMA_CUSTOM_ROCM_DEFS="-DLLAMA_HIP_UMA=on -DHSA_ENABLE_SDMA=off -DAMDGPU_TARGETS=gfx900 -DHSA_OVERRIDE_GFX_VERSION=9.0.0"' >> .profile
source .profile
The other ways to change `CMAKE_DEFS`:
Open ollama/llm/generate/gen_linux.sh file, find a line that begins with if [ -d "${ROCM_PATH}" ]; then, then few lines under it find the line that begins with CMAKE_DEFS=.
Add -DLLAMA_HIP_UMA=on -DHSA_ENABLE_SDMA=off -DHSA_OVERRIDE_GFX_VERSION=9.0.0 there and change both -DAMDGPU_TARGETS=$(amdGPUs) and -DGPU_TARGETS=$(amdGPUs) to gfx900 (this value depends on your iGPU of course). It should look like this:
CMAKE_DEFS="${COMMON_CMAKE_DEFS} ${CMAKE_DEFS} -DGGML_HIPBLAS=on -DLLAMA_HIP_UMA=on -DHSA_ENABLE_SDMA=off -DHSA_OVERRIDE_GFX_VERSION=9.0.0 -DCMAKE_C_COMPILER=$ROCM_PATH/llvm/bin/clang -DCMAKE_CXX_COMPILER=$ROCM_PATH/llvm/bin/clang++ -DAMDGPU_TARGETS=gfx900 -DGPU_TARGETS=gfx900"
Second thing we have to change is in ollama/gpu/amd_linux.go file. Find a line that begins with if totalMemory < IGPUMemLimit {. Just before it add totalMemory = 24 * format.GibiByte, where the value 24 is how much of VRAM can Ollama use for the models. I wouldn’t go beyond your_RAM_in_GB - 8. This code should look like this:
		totalMemory = 24 * format.GibiByte
		if totalMemory < IGPUMemLimit {
			slog.Info...
Now Ollama thinks my iGPU has 24 GB of VRAM assigned to it and doesn’t complain. Up to 24 GB will be used when Ollama is running and models are loaded, but when we stop the container, our RAM will be free again.
Compilation is simple and takes about 10 minutes:
cd ollama
go generate ./...
go build .
Now you can run Ollama with this command:
~/ollama/./ollama serve
Setting up systemd service is simple (paste this multi line command, change environment variables as needed):
sudo tee /etc/systemd/system/ollama.service > /dev/null <<EOF
[Unit]
Description=Ollama Service
After=network-online.target
Requires=multi-user.target
[Service]
ExecStart=/home/ubuntu/ollama/ollama serve
User=ubuntu
Group=ubuntu
Restart=always
RestartSec=3
Environment="HSA_OVERRIDE_GFX_VERSION=9.0.0"
Environment="HSA_ENABLE_SDMA=0"
Environment="OLLAMA_HOST=0.0.0.0:11434"
Environment="OLLAMA_MAX_LOADED_MODELS=2"
Environment="PATH=$(printenv PATH)"
[Install]
WantedBy=default.target
EOF
Reload daemon and enable the service, then restart container:
sudo systemctl daemon-reload
sudo systemctl enable ollama
Check if everything is working:
systemctl status ollama
Ollama models for other uses
Models downloaded with Ollama are in the usual GUFF format and can be used elsewhere. But their filenames consist of sha256 hashes. To obtain human-readable names, we can use a script based on Matt Williams’ work. Just run this script, you will see the real model names, and then you can copy the files and rename them accordingly. Script requires the jq package, which you can install using the sudo apt install jq command.
#!/bin/bash
# Based on Matt Williams' script https://github.com/technovangelist/matts-shell-scripts/blob/main/syncmodels
# Prints human-readable Ollama model names
# Requires `jq` package
# sudo apt install jq

base_dir_1=/usr/share/ollama/.ollama/models
base_dir_2=~/.ollama/models

# Use find to get all files under the 'model' directories
function print_models() {
  manifest_dir=${base_dir}/manifests/registry.ollama.ai
  blob_dir=${base_dir}/blobs
  find "${manifest_dir}" -mindepth 3 -maxdepth 3 -type f | while IFS= read -r file; do
    model=$( basename "$( dirname "${file}" )" )
    tag=$( basename "${file}" )
    digest=$( jq -r '.layers[] | select(.mediaType == "application/vnd.ollama.image.model") | .digest' "${file}" )

    # Print model paths and human-readable names
    echo "${blob_dir}/${digest/:/-}"
    echo "${model}:${tag}"
  done
}

[[ -d ${base_dir_1} ]] && base_dir="${base_dir_1}" && print_models
[[ -d ${base_dir_2} ]] && base_dir="${base_dir_2}" && print_models
VS Code / VS Codium
In order for VS Code / VS Codium to run in a container, we need to use a GUI profile. After creating the container, log in using the default ubuntu user:
incus exec <container_name> -- sudo --login --user ubuntu
For VS Code / VS Codium we need to install some required packages:
snapdif we want to use snap version of IDEfonts-notofor missing fontsyaru-theme-iconto get the same mouse cursor theme in IDE window as in desktop
sudo apt install snapd fonts-noto yaru-theme-icon
sudo snap install code --classic
# sudo snap install codium --classic
Snaps in Incus containers require a workaround, otherwise after reboot we’ll see an error:
snap-confine has elevated permissions and is not confined but should be. Refusing to continue to avoid permission escalation attacks
Please make sure that the snapd.apparmor service is enabled and started.
Solution comes from @stgraber post:
sudo sed -i "s/lxd/incus/g" /lib/apparmor/rc.apparmor.functions
sudo mkdir -p /etc/systemd/system/snapd.apparmor.service.d/
Finally, run this multi-line snippet of code that creates override.conf file and adds two lines to it:
sudo tee /etc/systemd/system/snapd.apparmor.service.d/override.conf > /dev/null <<EOF
[Service]
ExecStartPre=/usr/bin/mkdir -p /run/WSL
EOF
Extensions
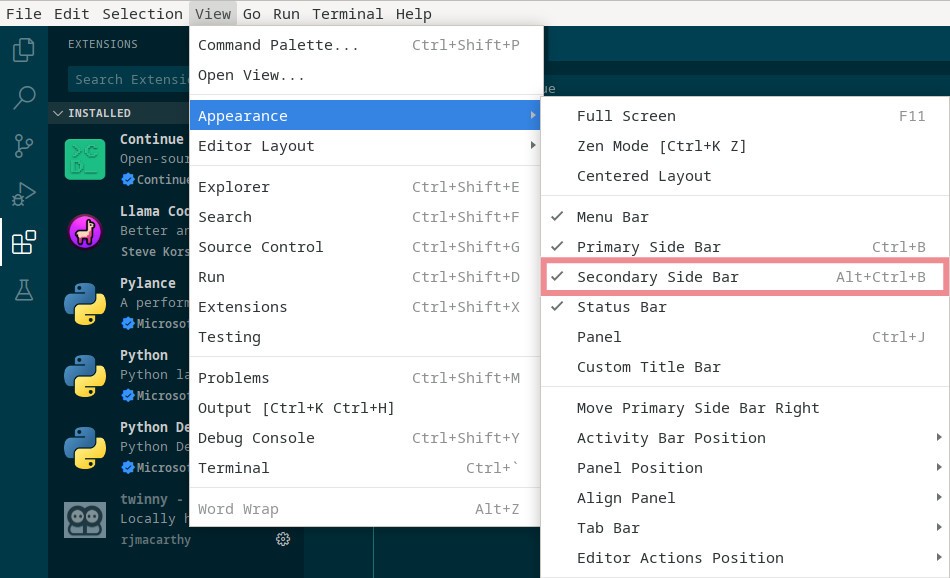
Continue and Twinny extensions for VS Code / VS Codium use the right side bar. Click View → Appearance → Secondary Side Bar to open it or press Alt+Ctrl+B. If the side bar doesn’t render properly, which can happen if you play with other extensions, just close it and re-open.
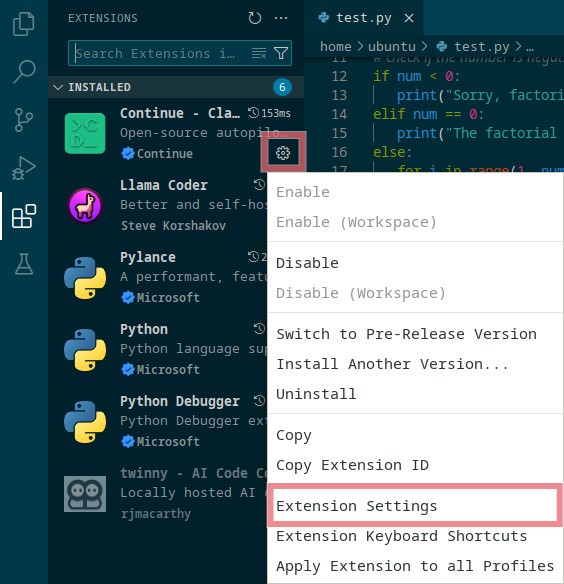
Extensions can be enabled / disabled by clicking on the cog icon next to extension’s name and selecting Enabled / Disabled.
Continue
First extension for VS Code / VS Codium that can interact with llama.cpp and Ollama servers is Continue (VS Code marketplace, VS Codium marketplace). It has a chat window and code auto-completion.
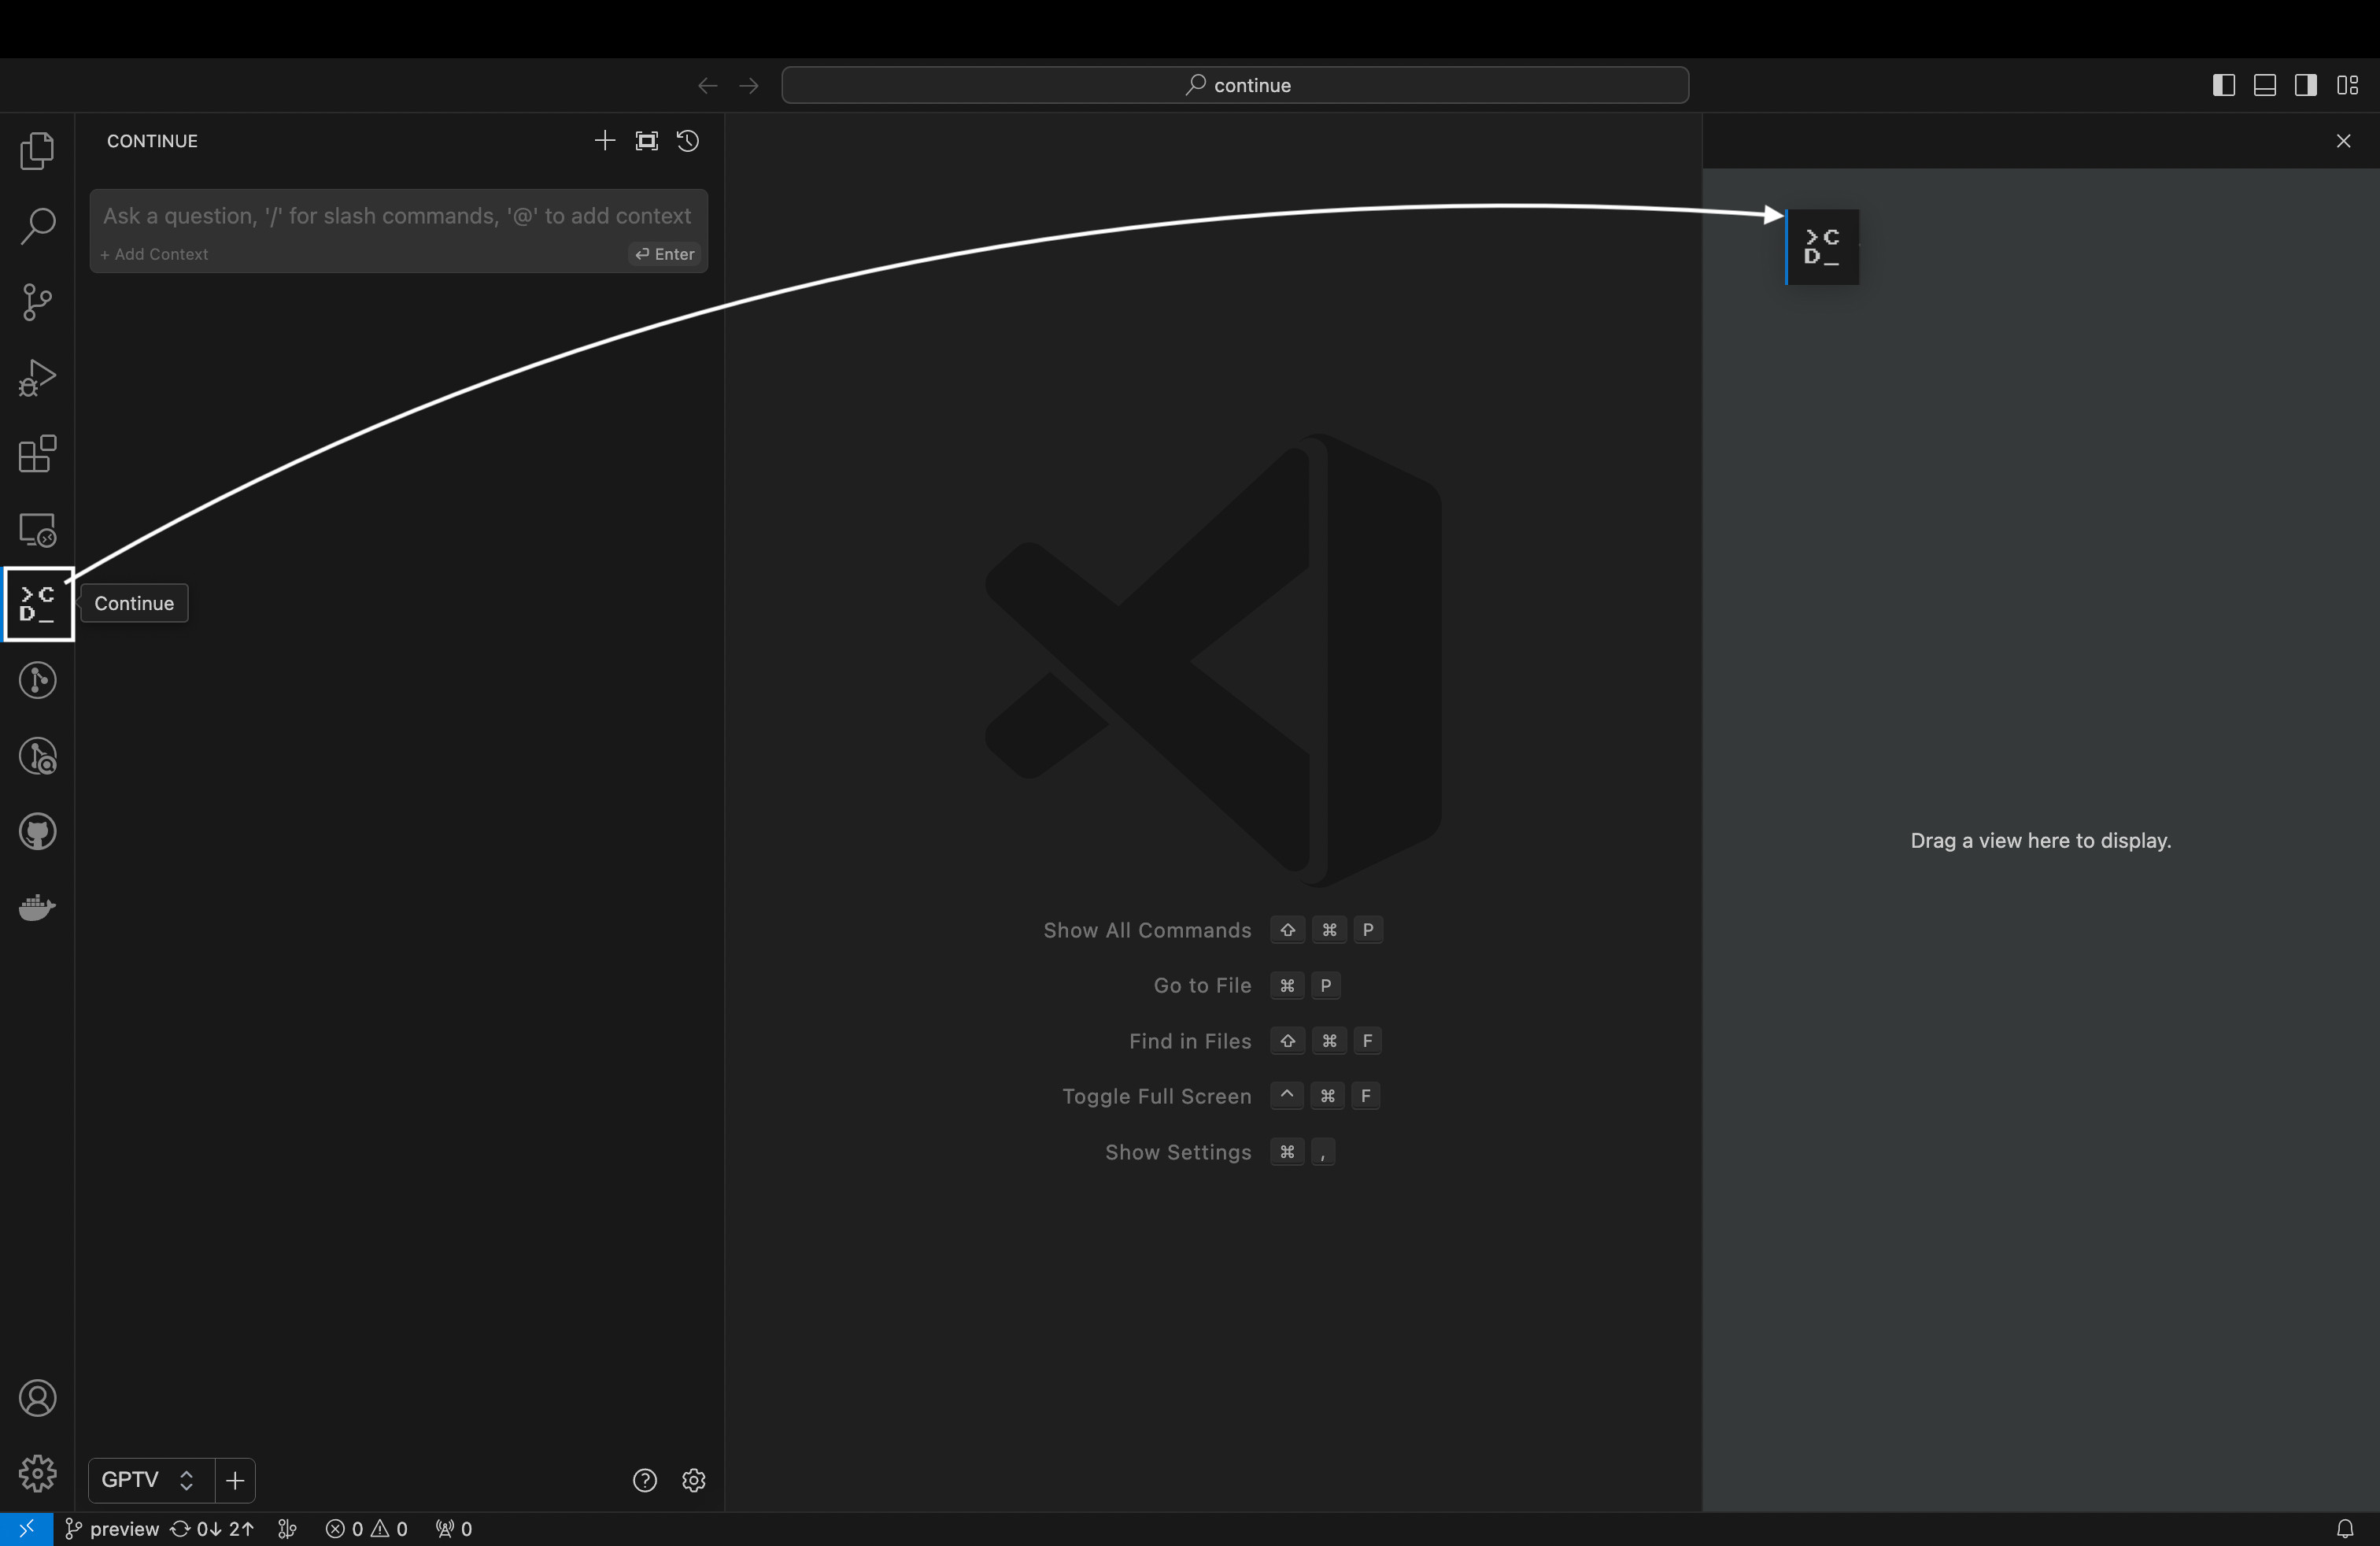
We can install Continue by searching for it in the extensions tab, on the left of IDE (Ctrl+Shift+X). Once installed, you will see the Continue logo show up on the left side bar. It’s strongly recommend to move this logo to VS Code’s right side bar.
There are more options available when you click on the cog icon next to Continue in the extensions tab and select Extension Settings. These are completely optional and I didn’t change anything there. If you decided to use code auto-completion, you can toggle that feature there, or at the bottom of the side bar.
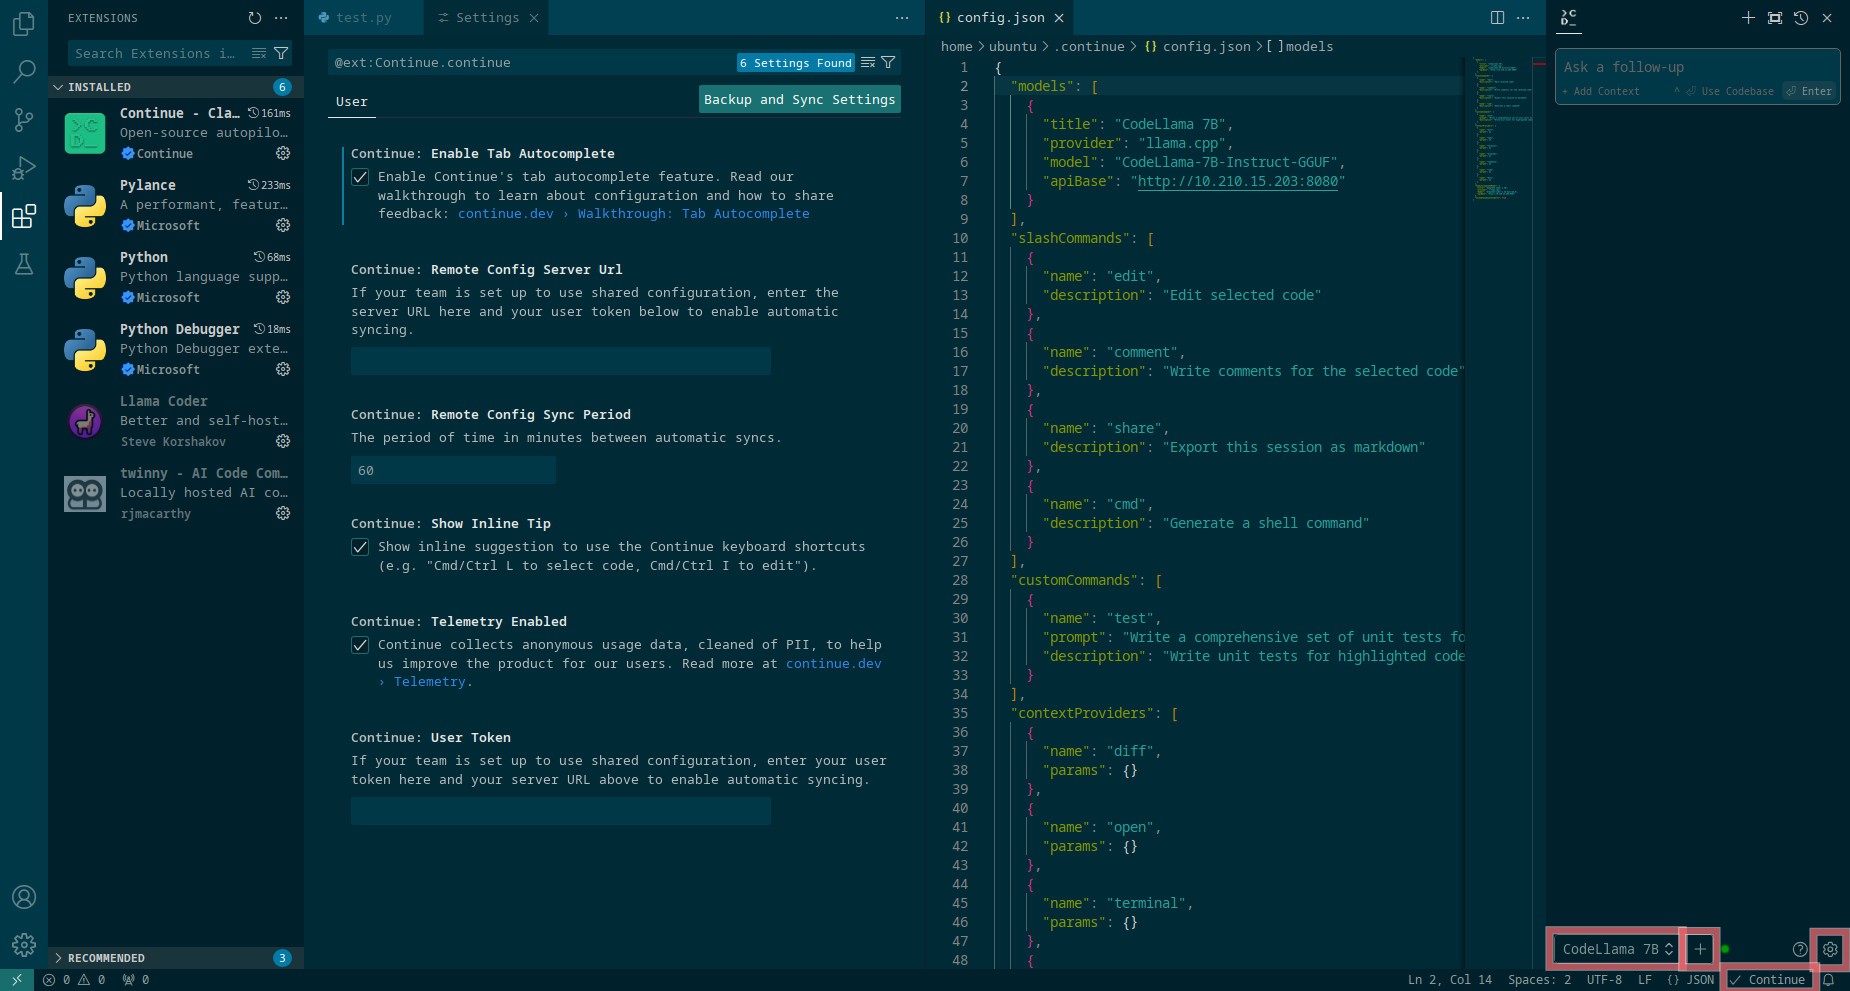
We can add model providers in two ways. One is to use the plus icon next to the active provider name at the bottom of the side bar. It’s worth exploring, because you can set there some advanced (optional) options.
I use the other way, which is to click the cog icon next to the plus icon. This will open config.json file. These are my settings for llama.cpp and Ollama chat models (I deleted the default providers, X.X.X.X is the IP address of the container, also notice commas , after some lines and brackets, model name is important only for Ollama, when you finish press Ctrl+S to save):
  "models": [
    {
      "title": "CodeLlama 7B",
      "provider": "llama.cpp",
      "model": "CodeLlama-7B-Instruct-GGUF",
      "apiBase": "http://X.X.X.X:8080"
    },
    {
      "title": "ollama CodeLlama 7B",
      "provider": "ollama",
      "model": "codellama:7b-instruct-q6_K",
      "apiBase": "http://X.X.X.X:11434"
    }
  ],
Once we’ve added our providers, at the bottom of the side bar we should see the active one, and we can switch between them by clicking on its name.
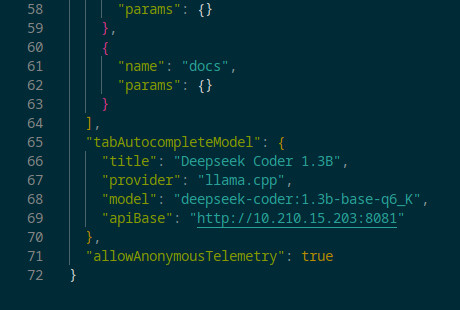
The code auto-completion model (only one at the time) can be set in the same config.json file, at the bottom, just before the line "allowAnonymousTelemetry": true. For llama.cpp:
  "tabAutocompleteModel": {
    "title": "Deepseek Coder 1.3B",
    "provider": "llama.cpp",
    "model": "deepseek-coder:1.3b-base-q6_K",
    "apiBase": "http://X.X.X.X:8081"
  },
Or for Ollama:
  "tabAutocompleteModel": {
    "title": "Deepseek Coder 1.3B",
    "provider": "ollama",
    "model": "deepseek-coder:1.3b-base-q6_K",
    "apiBase": "http://X.X.X.X:11434"
  },
To learn more about Continue and its many features, check out its homepage and YouTube.
Twinny
Second extension for VS Code / VS Codium that can interact with llama.cpp and Ollama servers is Twinny (VS Code marketplace, VS Codium marketplace). It has a chat window and code auto-completion.
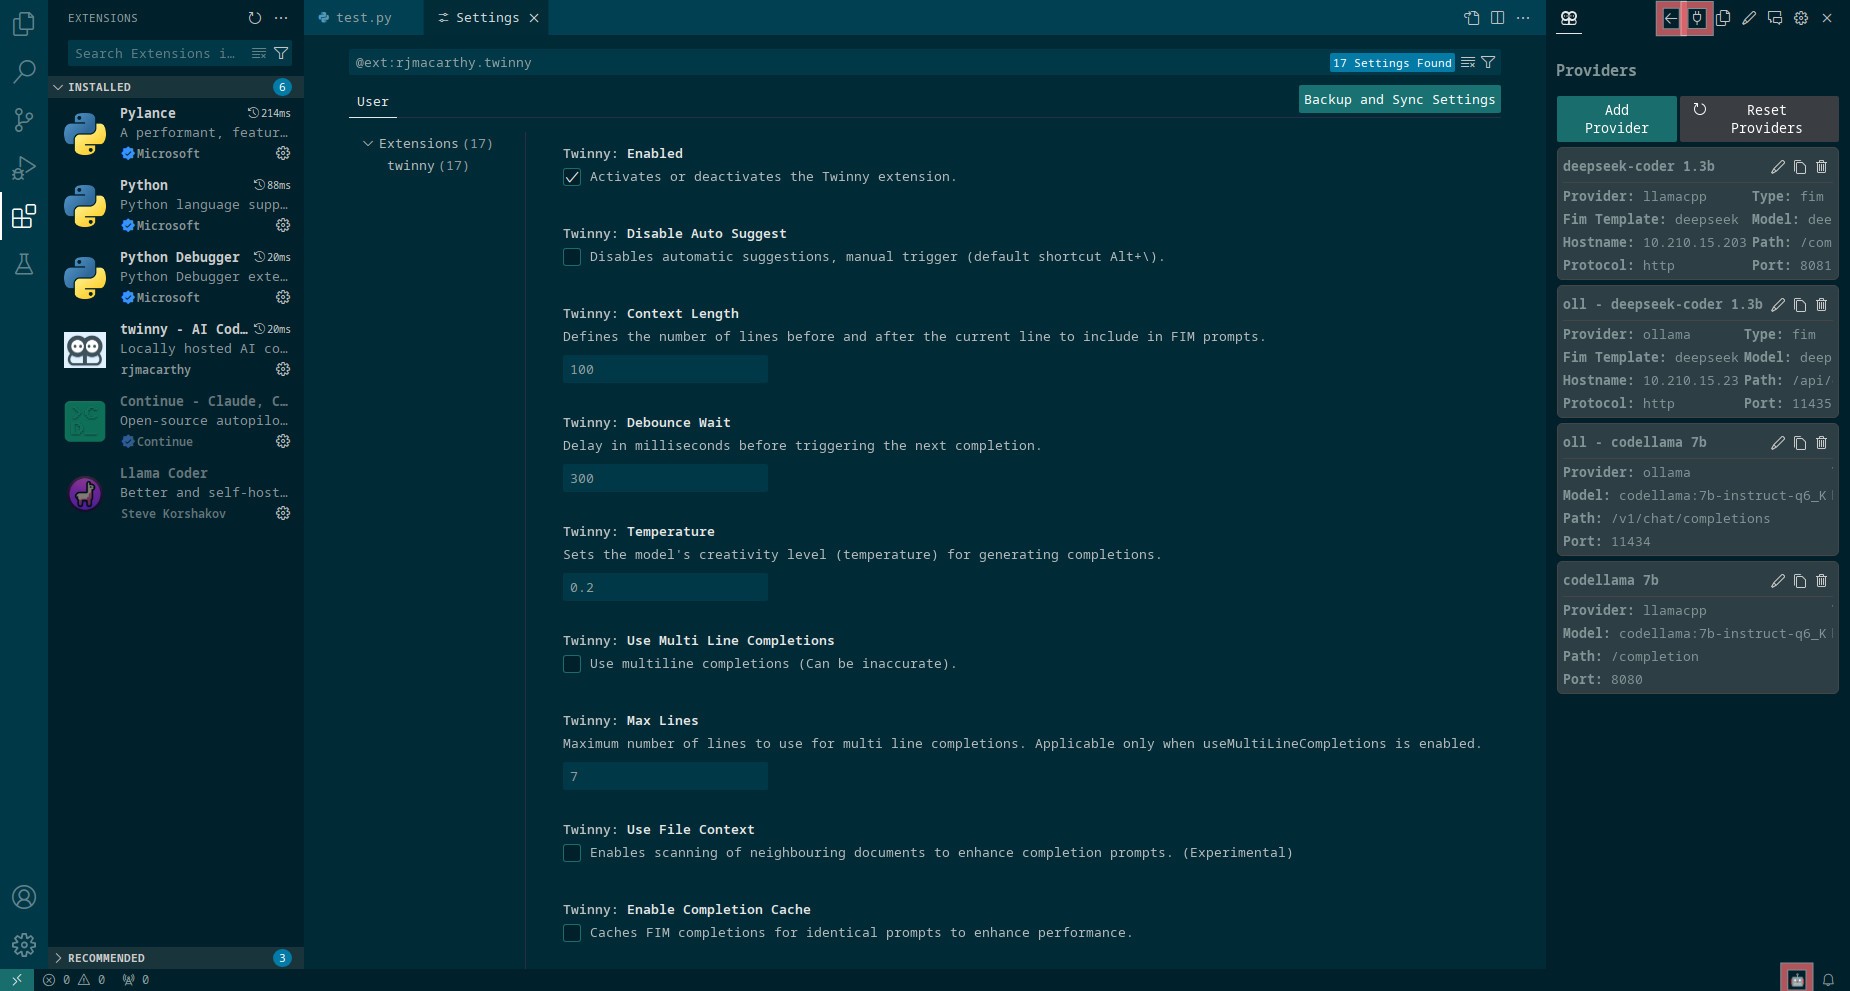
We can install Twinny by searching for it in the extensions tab, on the left of IDE (Ctrl+Shift+X). Now press Alt+Ctrl+B to open a side bar and click the plug icon at the top of it so we can add model providers. I’m using those settings for llama.cpp chat model:
- Label:
CodeLlama 7B(can be anything) - Type:
Chat - Provider:
llamacpp - Protocol:
http - Model name:
codellama:7b-instruct-q6_K(important only for Ollama) - Hostname:
X.X.X.X(container’s IP) - Port:
8080 - API path:
/completion - API key: empty
and base model:
- Label:
Deepseek Coder 1.3B(can be anything) - Type:
FIM - Fim Template:
deepseek - Provider:
llamacpp - Protocol:
http - Model name:
deepseek-coder:1.3b-base-q6_K(important only for Ollama) - Hostname:
X.X.X.X(container’s IP) - Port:
8081 - API path:
/completion - API key: empty
For Ollama chat model:
- Label:
ollama CodeLlama 7B(can be anything) - Type:
Chat - Provider:
ollama - Protocol:
http - Model name:
codellama:7b-instruct-q6_K(important only for Ollama) - Hostname:
X.X.X.X(container’s IP) - Port:
11434 - API path:
/v1/chat/completions - API key: empty
and base model:
- Label:
ollama Deepseek Coder 1.3B(can be anything) - Type:
FIM - Fim Template:
deepseek - Provider:
ollama - Protocol:
http - Model name:
deepseek-coder:1.3b-base-q6_K(important only for Ollama) - Hostname:
X.X.X.X(container’s IP) - Port:
11434 - API path:
/api/generate - API key: empty
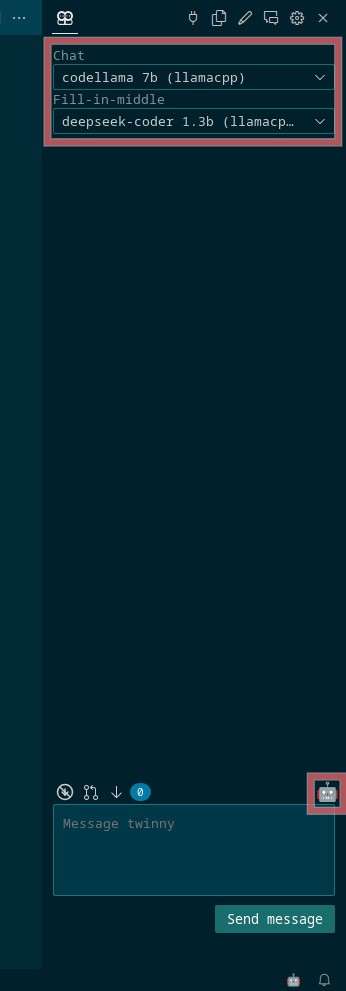
Now click an arrow icon next to the plug icon at the top of the side bar. Just above the chat entry field there is an icon of the robot head. When you click it, you’ll see two drop-down menus for selecting chat and fill-in-middle providers configured moments ago.
There are more options available when you click on the cog icon next to Twinny in the extensions tab and select Extension Settings, but these are completely optional and I didn’t change anything there.
To learn more about Twinny and its many features, check out its homepage and YouTube.
Cody Ai
Third extension for VS Code / VS Codium that can interact with Ollama server (but not llama.cpp) is Cody Ai (VS Code marketplace, VS Codium marketplace). It has a chat window and code auto-completion, but setting Ollama as the chat provider didn’t work for me.
Unusual things about Cody Ai:
- This is the most advanced code generation extension.
- Even though extension is open source, it requires a sign in using GitHub, GitLab, or Google account.
- For this reason, it requires internet access every time the IDE is launched
- For code auto-completion Cody Ai can use both types of models, instruct and base.
We need to install some required packages for Cody Ai to work:
chromiumor any other browsergnome-keyringfor storing sign in credentialsXDG_CURRENT_DESKTOP=ubuntu:GNOMEit’s necessary to set an environment variable that says container has a desktop environment (it doesn’t have to beubuntu:GNOME, otherwise you’ll see an error" As OS keyring couldn’t be identified for storing the encryption related data in your current desktop environment.
sudo snap install chromium
sudo apt install gnome-keyring
echo "export XDG_CURRENT_DESKTOP=ubuntu:GNOME" >> .profile
After restarting the container and running VS Code / VS Codium for the first time, we will be asked for a new password for the keyring. From now on, every time we start the IDE, you will be asked to enter this password.
Now we can install Cody Ai by searching for it in the extensions tab, on the left of IDE (Ctrl+Shift+X). Once installed, you will see the Cody Ai logo show up on the left side bar. It’s strongly recommend to move this logo to VS Code’s right side bar.
When you click the Cody Ai icon, you will be presented with three login options: using your GitHub, GitLab, or Google account. Click on your preferred method and a pop-up with a link will appear. Use the Copy button under the popup, open Chromium installed in the container, paste the link and log in. Click Authorize and close your browser. Your credentials should now be stored in your keyring. To check this, you can restart VS Code / VS Codium.
To add a provider, we need to open settings. Click on the cog icon next to Cody Ai in the extensions tab and select Extension Settings. Near the bottom you’ll find Cody Autocoplete Advanced Provider (notice it’s for code auto-completion, not chat). Set it to experimental-ollama. Next open ~/.config/Code/User/settings.json file in IDE or using any other editor. Add there those lines and save (X.X.X.X is the IP address of the container):
    "cody.autocomplete.experimental.ollamaOptions": {
        "url": "http://X.X.X.X:11434",
        "model": "deepseek-coder:1.3b-base-q6_K"
    }
For slower but more accurate inference, change model to codellama:7b-instruct-q6_K and url to http://X.X.X.X:11434. After the edit my settings.json file looked like this (commas , after some of the lines are important):
{
    "workbench.colorTheme": "Solarized Dark",
    "editor.inlineSuggest.suppressSuggestions": true,
    "cody.autocomplete.advanced.provider": "experimental-ollama",
    "cody.autocomplete.experimental.ollamaOptions": {
        "url": "http://X.X.X.X:11434",
        "model": "deepseek-coder:1.3b-base-q6_K"
    }
}
Setting Ollama as a chat provider didn’t work for me. You can read more about it on the official Cody Ai blog or watch the instructions on the YouTube channel.
IntelliJ
In order for IntelliJ to run in a container, we need to use a GUI profile. After creating the container, log in using the default ubuntu user:
incus exec <container_name> -- sudo --login --user ubuntu
For IntelliJ we need to install some required packages:
snapdif we want to use snap version of IDEdefault-jdksome version of java, e.g. default oneyaru-theme-iconandlibxcursor1to get the same mouse cursor theme in IDE window as in desktop
sudo apt install snapd default-jdk yaru-theme-icon libxcursor1
sudo snap install intellij-idea-community --classic
Snaps in incus containers require a workaround mentioned in VS Code / VS Codium section.
Plugins
We can install plugins by searching for them in the built-in plugins marketplace, which you can access by clicking Plugins in the main window. Or, if you have a project open, click the Hamburger Menu in the top left corner, then click File → Settings (or press Ctrl+Alt+S) and select Plugins from the left list.
Additional settings for installed plugins can be found at Hamburger Menu → File → Settings → Tools (or press Ctrl+Alt+S).
Continue
First extension for IntelliJ that can interact with llama.cpp and Ollama servers is Continue. Yes, this extensions is developed for both IDEs (IntelliJ marketplace). It has a chat window and code auto-completion.
We can install Continue by searching for it in the built-in plugins marketplace mentioned in Plugins section. Once installed, it can be accessed only when you have a project open, the icon will show up at the right side of the window. But you will notice that its tab doesn’t have any buttons. That’s because there are some missing dependencies for JCEF embedded browser. We can see which libraries are missing with this command in container’s terminal:
ldd /snap/intellij-idea-community/current/jbr/lib/libcef.so | grep "not found"
For me the output was:
libXdamage.so.1 => not found
libgbm.so.1 => not found
libxkbcommon.so.0 => not found
libpango-1.0.so.0 => not found
libcairo.so.2 => not found
Install missing libraries:
sudo apt install libxdamage1 libgbm1 libxkbcommon0 libpango-1.0-0 libcairo2
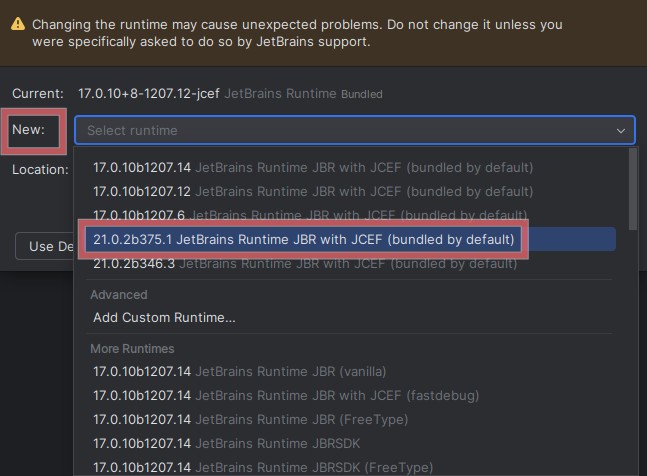
If you still don’t see the chat prompt in the Continue sidebar, try changing Boot Java Runtime for the IDE:
- Open Hamburger Menu → Help → Find Action (or press
Ctrl+Shift+A) - Enter
Choose Boot Java Runtime for the IDEand select it from the suggestion list - Select
New:and pick the latest 21 version, for example21.0.2b375.1 JerBrains Runtime JBR with JCEF (bundled by default) - Click OK and restart the IDE
After restarting IntelliJ everything should be OK. Adding providers to Continue looks exactly the same as in VS Code / VS Codium, so go back to that section for more information. Additional settings can be found at Hamburger Menu → File → Settings → Tools (or press Ctrl+Alt+S), where you can enable code auto-completion.
To learn more about Continue and its many features, check out its homepage and YouTube.
CodeGPT
Second extension for IntelliJ that can interact with llama.cpp server (but not Ollama) is CodeGPT (IntelliJ marketplace). It has a chat window and code auto-completion, but they can’t be configured separately. Which means you should use one or the other. CodeGPT can be used with Continue simultaneously though.
We can install CodeGPT by searching for it in the built-in plugins marketplace mentioned in Plugins section, but first we need to install one required library:
sudo apt install libsecret-1-0
CodeGPT can be accessed only when you have a project open, the icon will show up at the right side of the window. Settings can be found at Hamburger Menu → File → Settings → Tools → CodeGPT (press Ctrl+Alt+S) or you can access them by clicking plugin’s icon at the bottom right corner of the window.
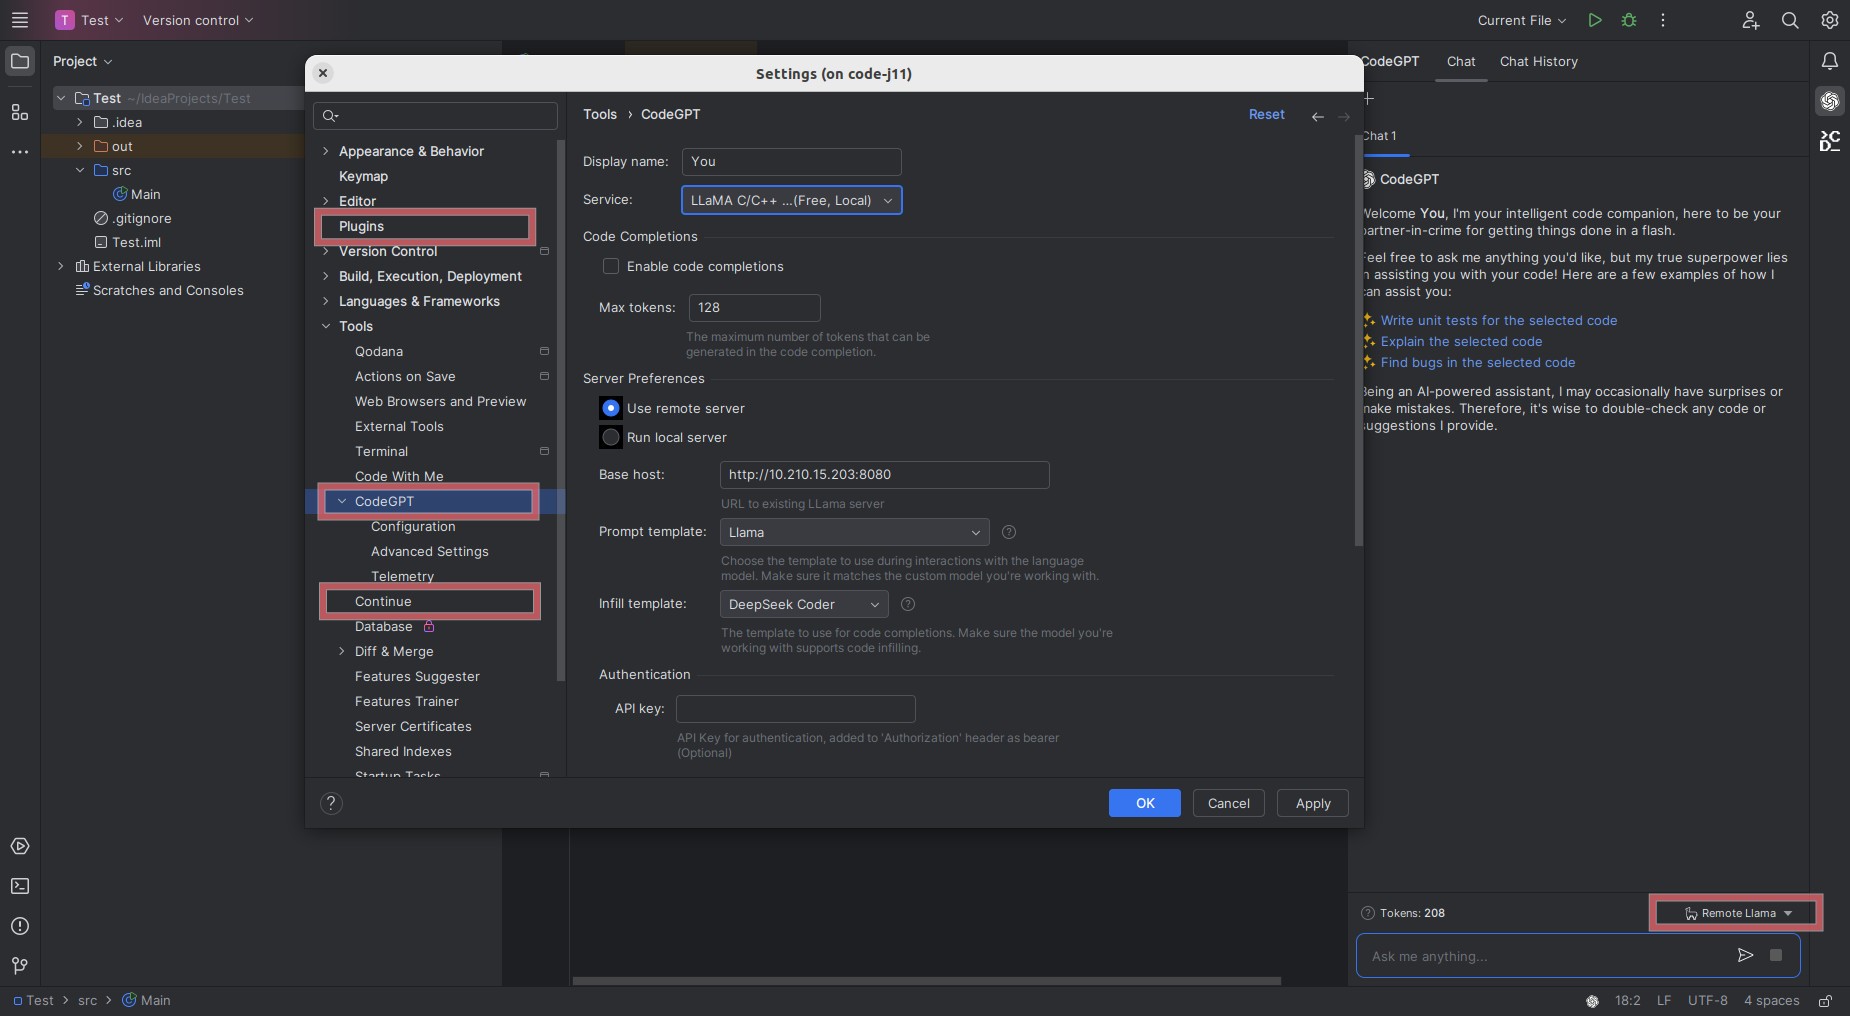
We can add provider there (see the screenshot in Plugins section):
- Service:
LLaMA C/C++ - Enable code completions:
no, unless you want this feature instead of chat - Use remote server:
yes - Base host:
http://X.X.X.X:8080, orhttp://X.X.X.X:8081if you enabled code completion,X.X.X.Xis the IP address of the container - Prompt template:
Llama - Infill template:
DeepSeek Coderif you enabled code completion
This new provider has to be selected in the toggle menu just above the chat prompt in CodeGPT side bar.
To learn more about CodeGPT and its many features, check out its homepage and YouTube.
Cody Ai
Unfortunately Cody Ai (IntelliJ marketplace) for IntelliJ does not support local Ollama and llama.cpp servers. For now this feature is only available for VS Code / VS Codium version.
That’s all. If you have any questions, feel free to ask. Feedback, corrections and tips are greatly appreciated.