6.5 update on debian 12.7 error

After update to 6.5 on my 12.7 host from the zabbly repo I’m getting this error when I try to start a debian VM:

Error: Unable to locate matching firmware: [{Code:/opt/incus/share/qemu/OVMF_CODE.4MB.fd Vars:/opt/incus/share/qemu/OVMF_VARS.4MB.ms.fd}]

Can you show incus config show --expanded NAME for that instance as well as ls -lh /opt/incus/share/qemu/?

I have the same issue for 1 vm instance

hmmm,

it has to do something with secureboot. When i disable this the machine is booting fine.

@stgraber

When the secureboot key is reset it all works fine again.

Sorry, I can’t anymore – upgrading to the most recent 6.5 and recreating the VM seems to have it in a working state again (not sure which solved it, or both).

I have the same issue for one VM running Debian 12 after upgrading to 6.5. Here’s the output you requested, @stgraber:

$ incus config show --expanded wireguard
architecture: x86_64
config:
  boot.autostart: "true"
  image.architecture: amd64
  image.description: Debian bookworm amd64 (20230503_05:24)
  image.os: Debian
  image.release: bookworm
  image.serial: "20230503_05:24"
  image.type: disk-kvm.img
  image.variant: default
  volatile.base_image: 3492c6765397a3370bf21c0e983d9d6a64cbf8d5a68d4804eb9653e7a0c7c721
  volatile.cloud-init.instance-id: f88b7125-432b-4682-9021-f5cc2a16f938
  volatile.eth0.hwaddr: 00:16:3e:a5:45:2d
  volatile.last_state.power: RUNNING
  volatile.uuid: a899a9d5-42d2-45c2-ba15-611cdff15a13
  volatile.uuid.generation: a899a9d5-42d2-45c2-ba15-611cdff15a13
  volatile.vsock_id: "46"
devices:
  eth0:
    name: eth0
    nictype: bridged
    parent: lxdbr0
    type: nic
  root:
    path: /
    pool: lxd-storage
    type: disk
ephemeral: false
profiles:
- default
stateful: false
description: ""
$ ls -lh /opt/incus/share/qemu/
total 5,1M
-rw-r--r-- 1 root root 3,5M Sep  6 23:22 OVMF_CODE.4MB.fd
lrwxrwxrwx 1 root root   16 Sep  6 23:22 OVMF_CODE.fd -> OVMF_CODE.4MB.fd
-rw-r--r-- 1 root root 528K Sep  6 23:22 OVMF_VARS.4MB.fd
-rw-r--r-- 1 root root 528K Sep  6 23:22 OVMF_VARS.4MB.ms.fd
lrwxrwxrwx 1 root root   16 Sep  6 23:22 OVMF_VARS.fd -> OVMF_VARS.4MB.fd
-rw-r--r-- 1 root root 157K Sep  6 23:22 efi-virtio.rom
drwxr-xr-x 2 root root 4,0K Sep  7 13:07 keymaps
-rw-r--r-- 1 root root 9,0K Sep  6 23:22 kvmvapic.bin
-rw-r--r-- 1 root root 256K Sep  6 23:22 seabios.bin
-rw-r--r-- 1 root root  39K Sep  6 23:22 vgabios-qxl.bin
-rw-r--r-- 1 root root  39K Sep  6 23:22 vgabios-virtio.bin

What kind of storage pool are you using?

There’s one more thing I’d need to get from a broken VM to be able to track this down, but that needs direct access to the VM config volume so depends on storage pool driver used.

Note that for a quick fix, setting security.secureboot to false, then starting the VM, then stopping it, then unsetting security.secureboot will force a reset of whatever firmware the VM is tracking.

I have a btrfs pool mounted to a partition on my hard drive. Let me know if I can provide anything else.

I tried disabling/enabling secureboot, and that certainly worked. So it’s fixed here now :slight_smile:

For btrfs, I’d need ls -lh /var/lib/incus/virtual-machines/NAME/ on a currently broken VM, the file listing should confirm what firmware are being looked for.

“Unfortunately” my broken VM was fixed by the secureboot toggle. Maybe someone else with the problem can post the output.

For reference, this is the output from the now working VM:

$ ls -la
total 2664956
d--x------ 1 root  root         252 Sep  7 17:39 .
drwx--x--x 1 root  root          44 Apr 19 21:10 ..
-rw------- 1 incus root      540672 Sep  7 17:44 OVMF_VARS.4MB.ms.fd
-rw-r--r-- 1 root  root         709 May  3  2023 agent-client.crt
-rw------- 1 root  root         288 May  3  2023 agent-client.key
-rw-r--r-- 1 root  root         741 May  3  2023 agent.crt
-rw------- 1 root  root         288 May  3  2023 agent.key
-r-------- 1 root  root        2648 Sep  7 17:43 backup.yaml
dr-x------ 1 incus root         210 Sep  7 17:43 config
-rw-r--r-- 1 root  root         535 May  3  2023 metadata.yaml
lrwxrwxrwx 1 root  root          19 Sep  7 17:39 qemu.nvram -> OVMF_VARS.4MB.ms.fd
-rw-r--r-- 1 root  root 10737418240 Sep  7 19:25 root.img
drwxr-xr-x 1 root  root          42 May  3  2023 templates

Hi,

I use zfs filesystem.

Mine also works fine now when i did a secureboot reset

I had the same issue with a Home Assistant VM and needed to do the secureboot toggle to fix as well.

The host system is running Noble and ZFS.

Not sure if this helps or its related but,

I was also having issues with secureboot and zfs on the host earlier today. Seems you need to reload your keys otherwise zfs would not boot and zpool list would always show empty. In my case it was showing key rejected.

You can check if secure boot is enabled sudo mokutil --sb-state

https://wiki.debian.org/SecureBoot

Or as per here,
$ sudo mokutil --import /var/lib/dkms/mok.pub # prompts for one-time password
$ sudo mokutil --list-new # recheck your key will be prompted on next boot

1 Like

Are you still looking for debug info on this?
It happened to me today, and I have some old VMs that don’t need fixing and can be used for testing. On ZFS,

No, we’ve got a fix for it that will be in 6.6, though I suspect most folks have caused a firmware reset by now and won’t really need the fix.

Hi.

Firstly, I am just reporting my experience (with two different servers using incus 6.6) as I am not sure if this is still the expected behavior or not with this version of Incus:

incus launch images:debian/12 vdeb --vm

Inside the vm, install zfs after adding the requisite repositories:

root@vdeb:~# apt install -y linux-headers-amd64 zfsutils-linux zfs-dkms zfs-zed

The compiling and install proceeds (be patient - it’s not fast) but right at the end you will see the zfs module doesn’t load - you’ll see this error or one like it:

modprobe: ERROR: could not insert 'zfs': Key was rejected by service
The ZFS modules are not loaded.
Try running '/sbin/modprobe zfs' as root to load them.

Rebooting does not fix this. I believe you can disable secure boot to get this to work but to me that defeats the purpose of having secure boot. So I wanted to do this more robustly. The solution is hinted at above but I struggled a little to get it all to work so I thought I would report my full working solution that I obtained via google (Debian-secure-boot) in the hope it’s useful to anyone for any module they need to get self-signed to work with secure-boot.

Issue the following command inside the vm. It will prompt you for a password to protect the keys it’s about to use to sign modules for secure boot. After that poweroff the vm (do not reboot):

root@vdeb:~# mokutil --import /var/lib/dkms/mok.pub 
input password: 
input password again: 
root@vdeb:~# poweroff  #shut it down, do not restart it via 'reboot'

Now re-start the vm but WITH A CONSOLE attached (this is the best way to do this because as you will see, you need that console access rather quickly, and I found it best to do at start):

incus start obiwan:vdeb --console=vga

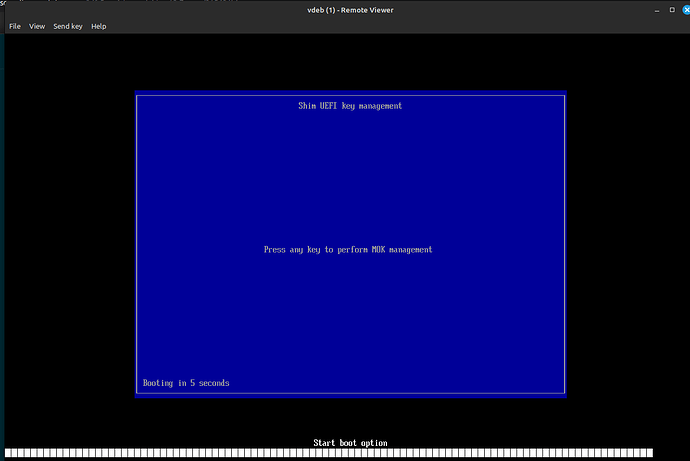
Pay attention to the console, because you only have a few seconds to select the option to add the signed key.

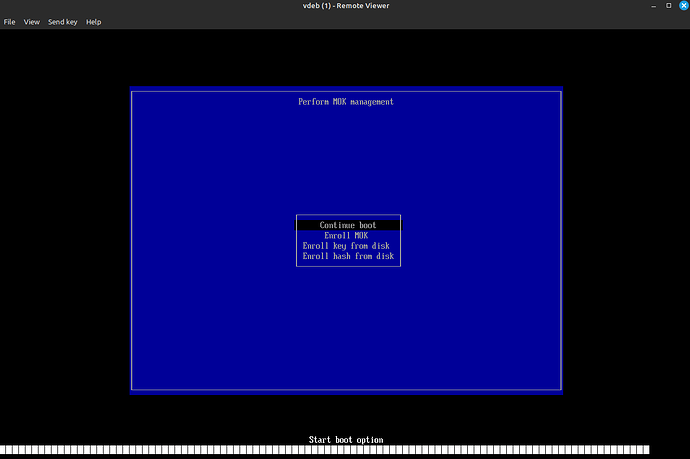
Quickly press a key in the console to enter the MOK management options. You’ll see this:

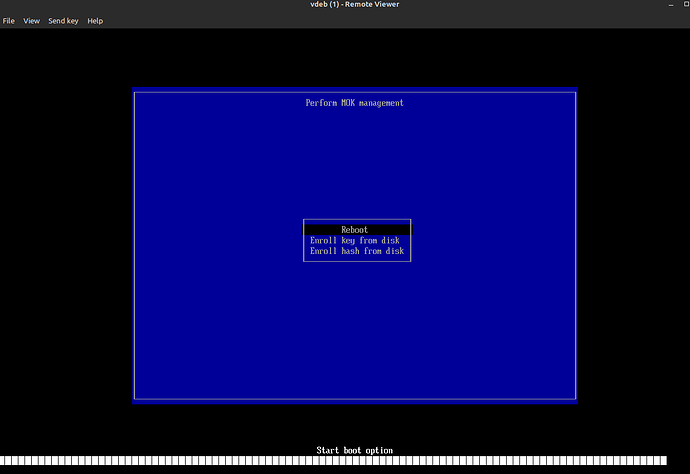
Select ‘Enroll MOK’ and follow the simple prompts. It allows you to view the fingerprints and of course to add the key, at which time it asks for the MOK password you used above. Do all that then it gives you this screen, just select reboot:

If you miss the window for ‘pressing a key’ then just let the vm re-boot, enter it via the agent and repeat the ‘mokoutil --import’ command to regenerate the boot option and then try again. It’s a little tricky but there is enough time once you get used to it. :slight_smile:

Once you add your key and reboot, enter the vm as normal (you can use the incus-agent or ssh now because we are done with the console for this purpose), you will see the zfs module has been activated:

incus exec obiwan:vdeb bash
root@vdeb:~# zfs --version
zfs-2.1.11-1
zfs-kmod-2.1.11-1
root@vdeb:~# 

V/R

Andrew
2 Likes