How can I expand the size of VM

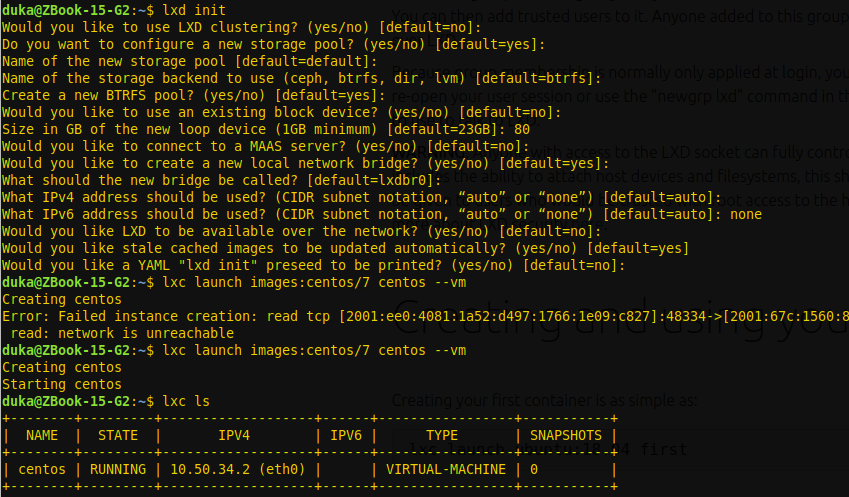
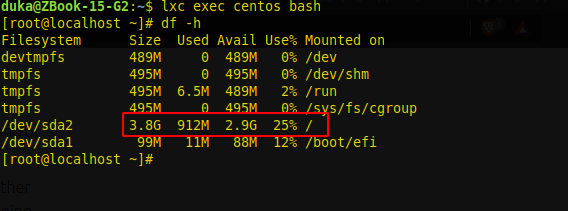
I created centos7 virtual machine. But when I go into the virtual machine, I see a capacity of root ( / ) about 4GB. How can I increase the capacity root ( / ) of virtual machines to 15GB?

Despite following the instructions of this article, I still cannot change as expected => LXD VM - how to set disk size?

screenshot_1

screenshot_2

1 Like

Which image are you using.

I have same LXC container for Centos 7 running and I have enough disk for root

[root@mongo-cent ~]# df -h
Filesystem Size Used Avail Use% Mounted on
/dev/sda3 108G 29G 74G 29% /
none 492K 0 492K 0% /dev

Please paste output of below commands

lxc remote list
lxc image list

Also, how much capacity do you have on your hosts root FS?

1 Like

Thanks for your reply!

Please note that I created vm with lxd, not containers. And this is my output

The disk image created by LXD is 10GB by default, but the image unpacked into it is smaller.

When using distro images with cloud-init, it auto resizes the partition and filesystem inside the VM on first boot.

However when using non-cloud-init based images it is necessary to do it yourself.

These commands work for me on our centos 7 image:

Before:

df -h
Filesystem      Size  Used Avail Use% Mounted on
devtmpfs        489M     0  489M   0% /dev
tmpfs           495M     0  495M   0% /dev/shm
tmpfs           495M  6.5M  488M   2% /run
tmpfs           495M     0  495M   0% /sys/fs/cgroup
/dev/sda2       3.8G  913M  2.9G  25% /

Resize:

yum install e2fsprogs cloud-utils-growpart gdisk
growpart /dev/sda 2
resize2fs /dev/sda2

After:

df -h
Filesystem      Size  Used Avail Use% Mounted on
devtmpfs        489M     0  489M   0% /dev
tmpfs           495M     0  495M   0% /dev/shm
tmpfs           495M  6.5M  488M   2% /run
tmpfs           495M     0  495M   0% /sys/fs/cgroup
/dev/sda2       8.9G  914M  8.0G  11% /
9 Likes

@tomp Many thanks tomp. Very easy to follow. I was successful

[root@localhost ~]# df -h
Filesystem      Size  Used Avail Use% Mounted on
devtmpfs        489M     0  489M   0% /dev
tmpfs           495M     0  495M   0% /dev/shm
tmpfs           495M  6.5M  489M   2% /run
tmpfs           495M     0  495M   0% /sys/fs/cgroup
/dev/sda2       8.9G  917M  8.0G  11% /
/dev/sda1        99M   11M   88M  12% /boot/efi
1 Like

@tomp I am confused as to how to do this properly with your lxd agent prepared images - if I init a vm like so:

lxc launch images:ubuntu/focal testvm --profile testvm --vm

Where my profile contains a basic root device config

  root:
    limits.read: 4000iops
    limits.write: 1000iops
    path: /
    pool: lxd
    size: 100GB
    type: disk

Then the size of the disk is unchanged - i.e. cloud-init is not kicking in and growing it. I tried adding the cloud init config disk device and also the growpart stuff to cloud init config which I’ve seen but I have no luck in making this happen automatically and have to run the commands manually. My full profile is now:

config:
  agent.nic_config: "true"
  boot.autostart: "false"
  limits.cpu: "10"
  limits.memory: 10GB
  user.user-data: |
    growpart:
      mode: auto
      devices: ['/']
      ignore_growroot_disabled: false
description: ""
devices:
  config:
    source: cloud-init:config
    type: disk
  eth0:
    limits.egress: 1000Mbit
    limits.ingress: 1000Mbit
    name: eth0
    nictype: bridged
    parent: br0
    type: nic
  root:
    limits.read: 4000iops
    limits.write: 1000iops
    path: /
    pool: lxd
    size: 100GB
    type: disk
name: testvmconfig:
  agent.nic_config: "true"
  boot.autostart: "false"
  limits.cpu: "10"
  limits.memory: 10GB
  user.user-data: |
    growpart:
      mode: auto
      devices: ['/']
      ignore_growroot_disabled: false
description: ""
devices:
  config:
    source: cloud-init:config
    type: disk
  eth0:
    limits.egress: 1000Mbit
    limits.ingress: 1000Mbit
    name: eth0
    nictype: bridged
    parent: br0
    type: nic
  root:
    limits.read: 4000iops
    limits.write: 1000iops
    path: /
    pool: lxd
    size: 100GB
    type: disk
name: testvm

Where am I going wrong / what am I misunderstanding here? :slight_smile: Thanks!

The images:ubuntu/focal image does not have cloud-init.

See How can I expand the size of VM - #4 by tomp for growing it manually.

Thank you for the clarification @tomp

That’s where the confusion comes from. In order to not have to install the agent manually and go through all those hoops you should use the images:ubuntu/focal image but that doesn’t include cloud-init

While the official ubuntu:focal images DO have cloud-init but not the agent.

(please correct the above if I’m wrong for posterity)

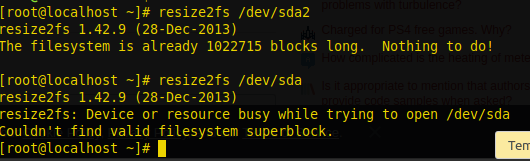
In any case - I will just run the commands - Can I rely on the root partition always being /dev/sda2 ?

To clarify further:

  • The LXD built image images:ubuntu/focal/cloud and later image variants include cloud-init and lxd-agent support.
  • The official ubuntu:focal and later images include both cloud-init and lxd-agent support. But ubuntu:bionic and earlier do not include the lxd-agent.

Hi ducnm

Before using the resize2fs command, delete the second partition (/dev/sda2) through fdisk /dev/sda and create it again.
And you can use the command resize2fs /dev/sda2.

Thanks

Hi Thomas, thank you for your tireless efforts here on the forums and elsewhere with this project. It doesn’t go unnoticed and I’m very thankful and appreciative of your work. It’s a very useful and reliable piece of software.

I’ve got a related question that I hope you can provide some clarity on:

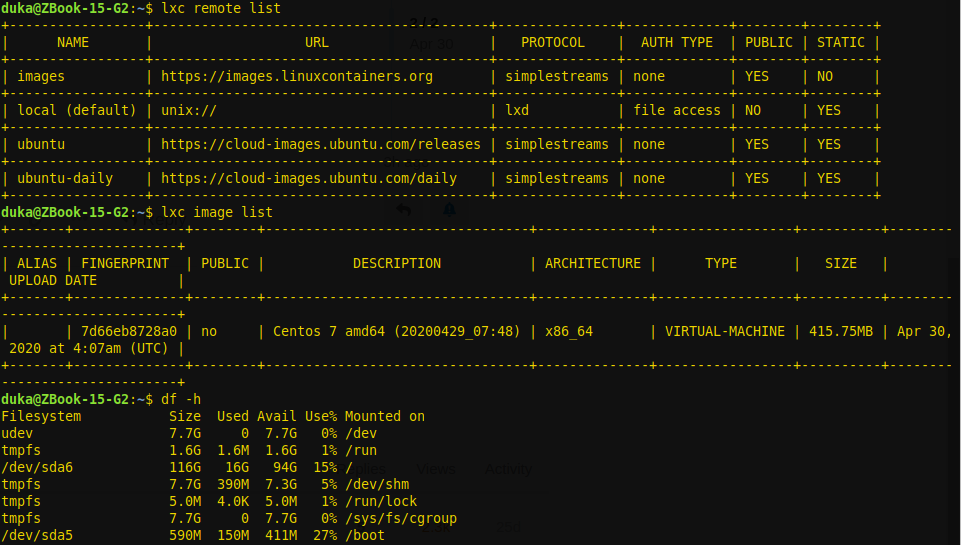
Can you explain how the image from the repository gets “unpacked” into the disk image? I’ve been having some strange behavior when trying to expand the size of the VM and I think the issues lies with how this unpack mechanism works.

For example, is it simply dd’d the repository image onto the 10GiB QEMU disk?

Thanks so much, hopefully it makes sense to ask in this topic.

Sorry for using you as a rubber ducky but once organized my thoughts and described the issue I think I figured out where to look. For anyone else wondering, I believe it’s here:

It looks like we shell out to qemu-img calling it as qemu-img convert -f qcow2 -O raw along with some potential performance related parameters.

tl;dr the qcow2 image from the repository gets converted into the 10GiB file via qemu-img logic.

I’m going to do some more testing but I might have reproducible data corruption bug as a result of qemu-img logic gone awry that might be worth accounting for or fixing upstream.