I have been trying to migrate a Virtual Box Virtual Machine which is an EFI booting instance of Ubuntu 24.04. I am using qemu-img to convert the Virtual Box VDI disk image to a qcow2.
qemu-img convert -f raw -O qcow2 "/home/scott/VirtualBox VMs/Linux/ubuntu/Snapshots/{1d79fcab-cbfd-4f85-9a3f-54dc402a8817}.vdi" /home/scott/Desktop/working/converted.qcow2
I then employ incus-migrate to import the resulting qcow2:
sudo incus-migrate
and this is what I did…
The local Incus server is the target [default=yes]: yes
Would you like to create a container (1) or virtual-machine (2)?: 2
Name of the new instance: converted
Please provide the path to a disk, partition, or qcow2/raw/vmdk image file: converted.qcow2
Does the VM support UEFI booting? [default=yes]: yes
Does the VM support UEFI Secure Boot? [default=yes]: no

Instance to be created:
  Name: converted
  Project: default
  Type: virtual-machine
  Source: converted.qcow2
  Source format: qcow2
  Config:
    security.secureboot: "false"

Additional overrides can be applied at this stage:
1) Begin the migration with the above configuration
2) Override profile list
3) Set additional configuration options
4) Change instance storage pool or volume size
5) Change instance network

Please pick one of the options above [default=1]: 1
Converting image "converted.qcow2" to raw format before importing
Instance converted successfully created
The result is that the hard disk image for the resulting incus VM is not booting.
This looks very much similar to an aspect of this problem for which I have a work-around but not a satisfying solution.
If you wait long enough, you’ll see various attempts to boot via PXE and HTTP. Eventually a uefi shell prompt will appear. At the prompt, type FS0: to make the following commands relative to the system disk drive. From there, use commands like ls and cd to find the .efi file to boot - maybe something like FS0:\EFI\ubuntu\grubx64.efi. When you’re in the right directory, you can just run grubx64.efi (or whatever the name is on your system) and the system will boot.
That’s all very well to do once or twice to check things are OK but not a viable long term solution. Instead, having found the location of the .efi file, add it to the front of the boot queue with the following uefi shell command: bcfg boot add 0 FS0:\EFI\ubuntu\grubx64.efi "Ubuntu boot"
Then type reset to exit the uefi shell and the after restarting, the VM should boot.
Good luck - it works here; I hope it works for you too!
Nevertheless, finding and manually adding the .efi file isn’t a prefect solution but it’s a start. Maybe someone here knows the real solution.
@chris I would say that is all well and fine. However, after all of the PXE and HTTP attempts, it never drops to a shell prompt, but instead goes to the “BIOS” screen for the incus VM.
OK @Scott_T - that’s a shame since the shell is actually a bit more straight forward. The steps you’ll need are:
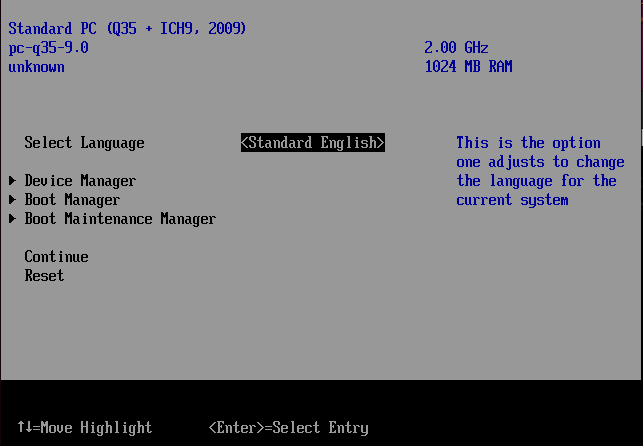
select Boot Maintenance Manager
in next window, select Boot Options
then, select Add Boot Option. You’ll then see a highlighted path - maybe labeled “NO VOLUME LABEL” (it’s your efi partition)
select that partiton label to reveal what directories it contains
select the appropriate directory (probably EFI) to reveal its contents
select the appropriate directory (maybe ubuntu?) to reveal its contents - hopefully a .efi file
select the .efi file (grubx64.efi?)
select “Input the description” (initially empty) which raises a text input box “Please type in your data” to input a label for this new entry. Input a suitable label (ubuntu?) then Return
select Commit Changes and Exit
now select “Change Boot Order”
you’ll see a list of paths you see there (should include the new one you just set a label for). Select “Change the order”
cursor down to your new path’s label and hit your + key until it has moved to top of the list. Then hit Enter key
Select “Commit Changes and Exit”
hit Esc key until back to original menu and select Reset
By now you should be back to normal command prompt from where you originally ran incus start NAME. The VM may still be running so ensure it has stopped. Now when restarted, maybe with incus start NAME --console=vga, it will (hopefully) run normally.
I hope I remembered all the steps for the ui - if not, just play around with it. The overall aim is just to find a path to your .efi file, give it a label and then make it the first option to boot.
Hey @Scott_T , another solution, arguably simpler, is to add a default .efi to the VM. This can be done to the original VM before migrating or to the new VM after migrating. In the latter case, we assume you can access the new VM’s root.img using whatever mechanism you use to run the original VM - looks like you’re using Virtual Box; I’m using qemu.
Anyway, log into the VM and, as root, mkdir /boot/efi/EFI/BOOT alongside existing /boot/efi/EFI/ubuntu. Now copy contents of /boot/efi/EFI/ubuntu into /boot/efi/EFI/BOOT. Now cd to /boot/efi/EFI/BOOT and rename or copy grubx64.efi to bootx64.efi
If you made this mod to the new VM, shut it down and then run it with incus start NAME and it should now just work. If you made the mod to the original VM, I assume incus-migrate should leave those changes alone so you can run the newly migrated VM immediately.
Interesting approach. Interestingly I have a high rate of success in QEMU VM migration. Migration fro VirtualBox seems to be where my problems evolve. That’s hard to understand because they both have viable boot partitions and valid grub files.
Ah, yeah, so if you migrate a VM from one EFI platform to another AND your installed OS did not populate /boot/efi/EFI/BOOT/bootx64.efi, then you’re indeed going to run into problems.
That’s because the EFI boot configuration is part of the the EFI NVRAM. That NVRAM isn’t part of the disk image, so converting the disk will not add that stuff back on the Incus side.
Most modern distros have grub automatically set up bootx64.efi specifically to handle this kind of issues as that also happens on physical systems during firmware updates.